Showing posts with label Christmas. Show all posts

Friday, December 24, 2010

Festive Fresh Flower Arrangement

I already made a Christmas Centrepiece this year but it was too big to have on the table at dinner.  Luckily my Birthday is right before Christmas and I received a beautiful bouquet of flowers from my mom.
Tall flowers don't really work at the table for obvious reasons, so I decided to shorten them and copy an idea I saw on Sarah Richardson's Christmas Special.  She used a "Mud Bud" for mudding the walls to put fresh flowers in and I had one in the workshop!  I removed the labels off the sides and put floral foam in the base of it.
I started by adding the baby's breath and than I added the other flowers.
This would look even better with a mirror underneath it so that the tea lights reflect not only in the "Mud Bud" but in the mirror.  Its the perfect size to keep on the table during dinner.
I also sprayed the whole arrangement with floral glitter for a more festive touch.
I used the leftover flowers to put into a small vase for the bathroom. I felt bad at first cutting the flowers, but I can actually see and enjoy the flowers much better at this height. I will be using this mud bud again!

Thursday, December 9, 2010

Vintage Christmas Sign

I was so excited when both boys napped at the same time the other day that I ran down to the workshop and started to look around to see what I could "craft" in an hour.  I found some scrap wood that used to be a top of a coffee table and thought it would make for a good sign.  I also had some vintage looking Christmas prints that I had saved from an old calendar.  I had no idea what I was doing but recently I had seen a tutorial at Funky Junk Interiors on how to distress signs.

Here is the before shot and how I winged it  a tutorial on how I did it:
I started by spray painting the sign black. 
 And than white...
I tried pulling off the white paint with a tape to distress it and it worked a little.
I used modge podge glue on both sides of the calendar sheets to adhere and seal them onto the wood.
I brushed on some "Honey Brown" acrylic paint on to match the colour of the calendar sheets.
I than thought I would crackle the sign, so I brushed on some crackle medium and when it dried I added a coat of red paint.  
It worked in a few spots but I didn't like the overall look of the sign.  So I roughly brushed on some white acrylic paint all over the sign including over the prints lightly and I liked it much better.
I still didn't think it was distressed enough so I tried using regular clear masking tape but it didn't pull enough paint off.  I saw some "Tuck Tape" nearby and decided to give that a shot...
And it worked beautifully!  It revealed a teal colour underneath...not sure how that happened?  
I am not 100% in love with it but I do think I successfully made a sign and made it look old.  I think its missing some hardware of some sort or needs to hang somewhere.  I also like the fact that it didn't cost me anything to make.  What do you think?  I'd love to hear your thoughts on it.  This project would be a great way to use up Christmas cards and scrap wood...I am going to try this again...

I am linking to one of my favourite blogs Centsational Girl and her Christmas craft linky party and Crazy Domestic's Linky Party

Saturday, December 4, 2010

Personalized Hostess Gift

I think a hostess gift that you can personalize always makes for a better gift.  I needed a little gift for our friends who invited us to cut down a Christmas tree on their property and I didn't want to bring the usual hostess gift such as a bottle of wine or tin of cookies.  I found this adorable little tin mitten at our local nursery and gift shop and I knew it would make for a great little gift.

I personalized it by hot glueing a little "L" on it in honour of their last name.  I had a bunch of these letters leftover from my "Peace" wreath I made on my last post. 

I then added some fresh pine, red dogwood branches and a bunch of silver glitter berries. 
I think for less than the cost of a bottle of wine, this gift is much more personable. I would keep this decoration out after the holidays by pulling out the red twig and berries and replacing them with some white twigs and blue accents.

Friday, December 3, 2010

Peace Wreath

I love all the colours of the Christmas season but for my entryway I wanted to enhance the area with some blues, silver and white...how peaceful!  I already had a wreath for the outside of my door but wanted one on the inside as well.  I started by taking an old grapevine wreath form and hot glueing different pine cones on to it.  I made them look snowy by liquid papering the edges.  I am all about doing things fast!  


I liked the natural look but wanted to jazz it up a little, so a trip to the dollar store (ofcourse) was needed.  I bought a package of wooden sparkly silver letters, 2 sparkly silver doves, a white berry garland, a package of silver snowflake ornaments and a gorgeous spool of blue and silver ribbon. Total spent for this wreath a whopping 6.00$!  While the boys ate breakfast this morning, I hot glued my new little trinkets and came up with this.  


There are lots of ways to hang a wreath like using 3M hooks but I just used an old gold wreath holder I had and covered it with ribbon.  

I love my little doves, they match my dollar store reindeer on my mantle. 

Wednesday, December 1, 2010

Christmas Woodland Centrepiece

We collected a few fresh birch logs from trees that had fallen recently.
My husband assisted me in cutting them with his band saw.  We could have also used a miter saw and put the log in a miter box.
We then put the logs in a vice and drilled a 1.5 inch diameter hole 3/4 inch deep to accommodate tealights.  I love the look of the logs with a tea light in them but it is much safer to use LED tea lights especially with the foliage around them.   Hopefully Santa will leave some in my stocking as I only have one!

I had originally placed the three logs on a woven tray but I felt it lacked some height, so I added a glass cake stand to create a two-tiered effect and I liked it much better.  I started by adding some dried moss I collected from the backyard, some fresh cedar and pine as well as pine cones.  I added four stone birds I had that I used in the garden in the summer to complete the little woodland setting, deer would have been a nice touch too.  


It seems most of my decor this year came from nature.  This is such an easy project and it doesn't matter if the logs are not cut perfectly straight or if the holes are drilled in the centre.  We actually followed the tree rings for the hole location.  Best part is that this project didn't cost anything and I can use these for  many different occasions by just changing up the decor around them.  


Tuesday, November 30, 2010

Simple Christmas Arrangement


I made these arrangements for the bathrooms at my work to add a little festive touch.  My goal was to make something nature inspired and not spend any money doing it.  I swiped the empty vases that were sitting in the bathrooms.  I foraged in the woods behind my house for any recent fallen birch and peeled the birch bark off of them.  I also cut some pine branches, dogwood branches and collected some spruce pine cones from the ground.  I used natural jute to tie the birch bark around the glass vase and added some green foam inside the vase to help anchor the branches.  It is hard to see in the photo but I liquid papered the pine cone edges to create a snowy effect.  (It was faster than opening a can of paint and washing a brush). These arrangements took a little time for the foraging but took five minutes to make.  I have received lots of great compliments from work on how they look in the bathrooms.

A Nature Inspired Christmas Porch

I used an old wreath form from previous years as a base for this years front door wreath, I added fresh cedar and red dogwood branches I collected from the backyard.  I added some fake berries I had on hand and 3 little metal buckets for a little something unexpected.  I think it gives it some rustic charm.


I finally treated myself to some black urns which I am looking forward to decorating all year long. 


I filled an old shrub pot with soil and added an empty water bottle so that when the pot expands due to the cold it will compress on the bottle and not the pot.  I collected pine, dogwood branches and added 3-4 birch logs.  I tied some red ribbon to a few branches for some extra colour.


These urn fillers sell for $19.99 and up at garden centres and grocery stores...mine were FREE:)

Whimsical Mantle

This is our first Christmas since we added a mantle to our fireplace...so you can imagine my excitement.  I am already thinking of how I will change it up next year... This year I wanted to use things I had so I only bought a few little things.  The dollar store provided the $2 wreaths and $1 reindeer and a $1 box of bells.  The "Hope" stocking holders were $14.96 at Walmart.  I would have preferred the word "Noel" but that was all they had.  Everything else I had, I just spray painted a couple of pots and candle sticks in heirloom white to create a more cohesive look.  I love my fake window which used to hold two plants, its so versatile and I can use it to decorate for any season.


I am linking to:
The Lettered Cottage

Christmas Book Count Down

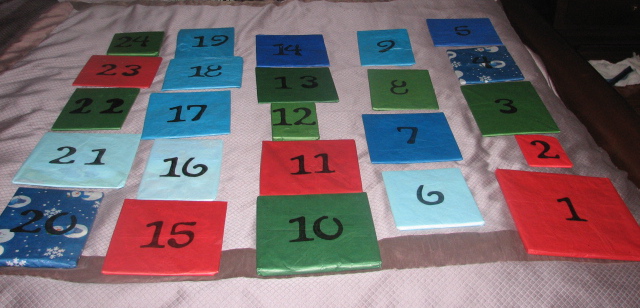
The Christmas book count down starts tomorrow.  I cannot wait.  My 3 year old is really into reading books right now and I thought it would be fun to count down the days of December with a wrapped Christmas book each night before bed.  I already had a few books, my mother in law lent me a couple, my Mom found a few from our childhood and I got the rest at thrift stores and splurged on a few new ones.  I wrapped each book in reused tissue paper and monogrammed the days of the month with a stencil and black sharpie marker. 


I found an old tool box in the shed that would be perfect to house the books and perfect to paint with chalkboard paint so that I could change up the days of the month. I am hoping Santa leaves me a chalk marker in my stocking so that I can write better on my chalkboards:)


I think it looks great on the bottom of my entry table but unfortunately I think it will have to remain on my dresser in my room as I don't think the boys will be able to resist unwrapping them when we are not looking.  This was all in all a really fun project:)


Glittered Christmas Tree

I needed something tall and red for my mantle this year and after seeing lots of glittered Christmas trees in the stores this year, I attempted to make one myself.  I painted the styrofroam cone with acrylic red metallic paint and sprinkled dollar store red glitter onto the wet paint.  I spray painted an old glass candlestick I had and hot glued it to the base of the tree. I added a silver bell for a little more bling. Total cost $4.49 plus 2$ for the paint and glitter which I still have leftover for other projects.